


Hey Everyone!
I've been seeing a lot of new faces, and have seen a lot of questions about Treasure Mapping and successfully locating chests quickly and efficiently. This guide isn't a walk through on how to train the necessary skills (lockpicking, disarm trap, and cartography + your personal flavor of how to kill monsters) this is more of a guide to show people how I do my T-mapping.
What you will need:
ClassicUO
Razor Enhanced (Razor Enhanced Website)
A basic understanding of Razor Enhanced.
This guide will go in three steps:
1) Utilizing Your World Map
2) Utilizing Razor Enhanced Inspect Entities + a script/hotkey to easily access in game
3) An in-game example of me utilizing this.
So let's begin!
Step 1: Utilizing Your World Map
Razor Enhanced has a very nice world map that is able to be utilized. You can pull the world map up from your options bar:

The world map looks like this:

This is a website I use for map markers, the installation is pretty simple I find it to be very useful for all aspects of UO. I know others have different markers, these happen to be what I use: CUO World Map Map Markers
Now let's talk about what's on this map in that upper left-hand corner.

There are four numbers here:
724, 1251 (26) [4]
What we're really interested in are those first two numbers, these numbers are the world tile location that you are currently standing on. Similar to coordinates (ex: 68*N 43*W) except this is the unique tile on the game map. To my understanding, no other tile should have this number. The number in parenthesis I is the Z axis-tile that has no bearing on our T-mapping. The fourth number in [Brackets] is how far zoomed in on the World Map you are.
The tile location will be used to help locate the exact tile location of our treasure from the treasure map as we will see later on in this guide.
Step 2: Utilizing Razor Enhanced Inspect Entities + Script/Hotkey:
Razor enhanced comes with a very nice scripting program using Python. I suck at programming, but I can at least bumble my way through something when I need to. Here is a link for Razor Enhanced programming wiki that you can use to find useful scripting lines.

Under the Razor Enhanced scripting tab, you can see that you can add scripts, tell it to loop, and name it however you want. As you can see I have many simple names for training, or heals, or even utilizing lockpicks easier. The very bottom of this I have "noobinspect" which is a simple script for opening the "Inspect Entities" of razor enhanced. To create a script, select the "New" option and it will open a blank script which appears like this:

As you can see here, I have boxed the "Inspect Entities" option in the script, because this is what we're interested in for our T-mapping goals. "Inspect Entities" gives you a wide range of information on whatever you select in game. When you click "Inspect Entities" it will turn your in-game mouse into a target cursor. Here is an example of Riddish's Cu Sidhe when I select her with Inspect Entities:

(Such WOW! Good girl, Bailey. Keep up the solid work!)
So what we're going to do is create a script that allows you to bind this "Inspect Entities" script to a hotkey to utilize "Inspect Entities" easily in game :

It is literally one line, that is it. Once you have this one line typed in, save the script as whatever name you wish. After that, add it to your list of scripts in the Razor Enhanced Scripting tab by clicking the "Add" box under Script Operations. It should now appear on your script list.
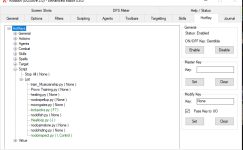
From here, navigate to your Razor Enhanced HotKey tab, click the drop down under HotKeys, then Scripts, then List. Here it will list all the scripts you have added under your scripting tab, It will look something like this:

I try to make my hotkeys common-sense bound for the most part, so Ctrl + I for inspect made sense to me. Bind whatever key stroke/combination you want. (Pro tip: Ensure the PASS KEY TO UO box is unchecked, so it doesn't spam your hotkey keystrokes into UO)
At this point, while using razor enhanced in game, you should now be able to hit your "Inspect Entities" key stroke, and it will bring up a targeting cursor.
Step 3: An In-game Example Of Utilizing What We Just Did
So, now that we're here, let me show you how this works!
You must decode the map first, the game doesn't even know where the treasure map will point you until you decode the map.

Huzzah! First attempt! Now you can choose to identify where the map is located in the world however you like, I've gotten pretty good at recognizing areas/locations, but you can also teleport to the facet you need to be in, and expand your world map to find it:

So this map has me East of the town of Yew.
Next up, let's use our new "Inspect Entities" hotkey to find out the tile location of our treasure!

The Location(1067, 1074) is the exact tile location (remember those numbers on our World Map we discussed earlier? That tile location).

As you can see from the World map, I'm in the spot the map tells me to go, but also look at my tile location. I'm at 1069, 1073 compared to the treasure location 1067, 1074. You only need to be within a few tiles (depending on cartography skill) to dig up a chest. You cannot stand on the exact tile or else it will tell you to move. So let's dig it up!


Success!
Conclusion:
That's all there is to it. When I first started T-mapping it took me quite awhile until I stumbled upon this simple way to do it. I hope this guide helps, and let me know if you have any questions. Otherwise, happy treasure hunting, and I'll see you in Sosaria!

I've been seeing a lot of new faces, and have seen a lot of questions about Treasure Mapping and successfully locating chests quickly and efficiently. This guide isn't a walk through on how to train the necessary skills (lockpicking, disarm trap, and cartography + your personal flavor of how to kill monsters) this is more of a guide to show people how I do my T-mapping.
What you will need:
ClassicUO
Razor Enhanced (Razor Enhanced Website)
A basic understanding of Razor Enhanced.
This guide will go in three steps:
1) Utilizing Your World Map
2) Utilizing Razor Enhanced Inspect Entities + a script/hotkey to easily access in game
3) An in-game example of me utilizing this.
So let's begin!
Step 1: Utilizing Your World Map
Razor Enhanced has a very nice world map that is able to be utilized. You can pull the world map up from your options bar:
The world map looks like this:
This is a website I use for map markers, the installation is pretty simple I find it to be very useful for all aspects of UO. I know others have different markers, these happen to be what I use: CUO World Map Map Markers
Now let's talk about what's on this map in that upper left-hand corner.
There are four numbers here:
724, 1251 (26) [4]
What we're really interested in are those first two numbers, these numbers are the world tile location that you are currently standing on. Similar to coordinates (ex: 68*N 43*W) except this is the unique tile on the game map. To my understanding, no other tile should have this number. The number in parenthesis I is the Z axis-tile that has no bearing on our T-mapping. The fourth number in [Brackets] is how far zoomed in on the World Map you are.
The tile location will be used to help locate the exact tile location of our treasure from the treasure map as we will see later on in this guide.
Step 2: Utilizing Razor Enhanced Inspect Entities + Script/Hotkey:
Razor enhanced comes with a very nice scripting program using Python. I suck at programming, but I can at least bumble my way through something when I need to. Here is a link for Razor Enhanced programming wiki that you can use to find useful scripting lines.
Under the Razor Enhanced scripting tab, you can see that you can add scripts, tell it to loop, and name it however you want. As you can see I have many simple names for training, or heals, or even utilizing lockpicks easier. The very bottom of this I have "noobinspect" which is a simple script for opening the "Inspect Entities" of razor enhanced. To create a script, select the "New" option and it will open a blank script which appears like this:
As you can see here, I have boxed the "Inspect Entities" option in the script, because this is what we're interested in for our T-mapping goals. "Inspect Entities" gives you a wide range of information on whatever you select in game. When you click "Inspect Entities" it will turn your in-game mouse into a target cursor. Here is an example of Riddish's Cu Sidhe when I select her with Inspect Entities:
(Such WOW! Good girl, Bailey. Keep up the solid work!)
So what we're going to do is create a script that allows you to bind this "Inspect Entities" script to a hotkey to utilize "Inspect Entities" easily in game :
It is literally one line, that is it. Once you have this one line typed in, save the script as whatever name you wish. After that, add it to your list of scripts in the Razor Enhanced Scripting tab by clicking the "Add" box under Script Operations. It should now appear on your script list.
From here, navigate to your Razor Enhanced HotKey tab, click the drop down under HotKeys, then Scripts, then List. Here it will list all the scripts you have added under your scripting tab, It will look something like this:
I try to make my hotkeys common-sense bound for the most part, so Ctrl + I for inspect made sense to me. Bind whatever key stroke/combination you want. (Pro tip: Ensure the PASS KEY TO UO box is unchecked, so it doesn't spam your hotkey keystrokes into UO)
At this point, while using razor enhanced in game, you should now be able to hit your "Inspect Entities" key stroke, and it will bring up a targeting cursor.
Step 3: An In-game Example Of Utilizing What We Just Did
So, now that we're here, let me show you how this works!
You must decode the map first, the game doesn't even know where the treasure map will point you until you decode the map.
Huzzah! First attempt! Now you can choose to identify where the map is located in the world however you like, I've gotten pretty good at recognizing areas/locations, but you can also teleport to the facet you need to be in, and expand your world map to find it:
So this map has me East of the town of Yew.
Next up, let's use our new "Inspect Entities" hotkey to find out the tile location of our treasure!
The Location(1067, 1074) is the exact tile location (remember those numbers on our World Map we discussed earlier? That tile location).
As you can see from the World map, I'm in the spot the map tells me to go, but also look at my tile location. I'm at 1069, 1073 compared to the treasure location 1067, 1074. You only need to be within a few tiles (depending on cartography skill) to dig up a chest. You cannot stand on the exact tile or else it will tell you to move. So let's dig it up!
Success!
Conclusion:
That's all there is to it. When I first started T-mapping it took me quite awhile until I stumbled upon this simple way to do it. I hope this guide helps, and let me know if you have any questions. Otherwise, happy treasure hunting, and I'll see you in Sosaria!
Attachments
Last edited by a moderator:
")